If there's a smartphone, there's a camera; as simple as that. If there's a camera, there are photos. It is important to be able to transfer the beautiful photos you have taken with your Google Pixel 3a/3a XL to your PC.
Decision has been made that Google is going to uncouple the Google Photos from Google Drive thus no photos automatically keeping sync in this storage service, which means that you will have to periodically backup your Google photos in no case of the data loss. And people are confusing how they track back their photos if there is no backup in Google Drive. Never mind, here is a tutorial to relieve your anxiety.
Syncios Android Manager is designed to manage the files on Android phones characterizing Backup, Recover and Transfer between phones. In order to sync your Google photos, you are allowed to import and export photos with assistance of Syncios Android Manager. Steps here are for your reference.
Step 1 Freely download and install Syncios Android Manager on your laptop. As a mobile phone program to be frequently used and timely update, it is also free for your anytime upgrade. Download and install Syncios Android Manager serves as full preparetion for the job.
Step 2 Connect the Google Phone to Syncios Android Manager through USB cable when program will detect the targeted phone to load the data existing on your Phone. On your Google, please follow the tips to authorize the Sync-PC permission and to install Syncios Android Manager on your phone, which just takes up a little bit of RAM.
FAQ: Answer to USB Debugging on Google Pixel series, kindly here to fix it out.
Step 3 On the panel of the homepage, you can view the options available to manage involving Apps, Contacts, SMS, Media and Photos. Here you can choose to enter for a detailed management. This is absolutely a faster way to have a detailed look into the file having on your Google phone.
![]()
Step 4 Tag on Photos when images files on your phone had been clearly shown up on the program and you can selectively tick on the files or bulky choice of the files to prepare for the backup to PC.
![]()
If you want to delete the photos you want, you can also kick on the unwanted or rubbish images and delete to further more free up the space on your phone.
Step 5 Hit on Export and set up a folder path for the backup files and click on OK to start Sync. Tip for you to put the files on a specially created folder named SynDroid Photos as default path and you can access to it at your hand.
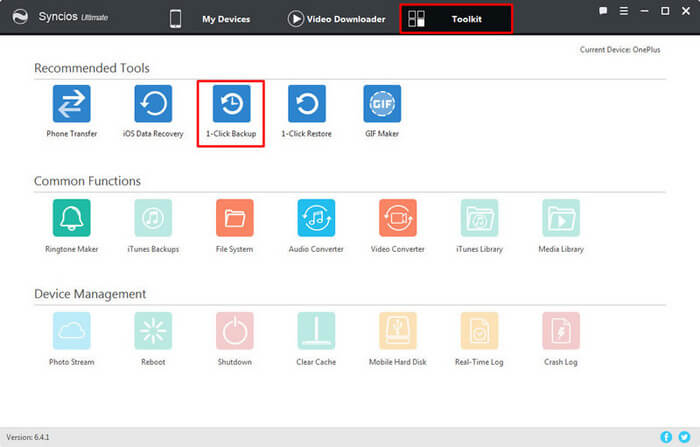
If there are bulky pictures in your original Google devices and you would like to move the photo files in one time. Button 1-click backup is designed to satisfy the need of such big file.
Note: Syncios 1-Click Backup function is only available for ultimate user. You can upgrade to ultimate version or learn more difference between free version and ultimate version through Syncios Android Manager's Version Compare.
Step 1 Under Toolkit, go to Recommend Tools and click the 1-Click Backup icon to start the one key backup tool.

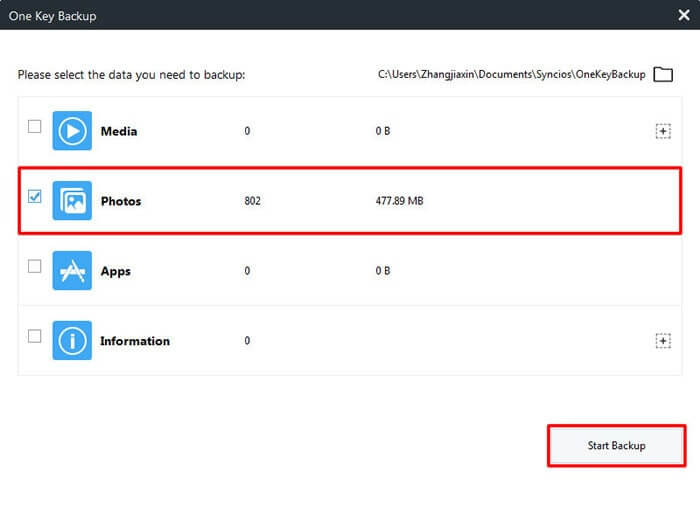
Step 2 Among Media, Photo, Apps and Information, you can select Specific Photos to Transfer from Google photos to Computer. The same goes to choose an easily-found location for the backup folder.
Step 3 Click on Start Backup to get the process done.

Supported OS: Android 3.0+
Editor Likes: Now you have easily backed up the photos without any data or quality loss so you can find them out at any time in need. Syncios Android Manager can help you to retrieve them back to your phone by button 1-Click Restore to access to the path of Syncios Android Manager Photo you did in the previous step.
Syncios Android Manager has as well featuring in converter function that you can convert the video on your phone to GIF, freely download Youtube video into Google phone, etc. This is so cute a tool compared with those monotonous managers. There are more tricks on the features built in Syncios Android Manager. If you are an Android loyalist or a new Android user from iOS devices, Syncios Android Manager is a highly recommendation for you.
Related Articles: