![]() >5 Ways to Transfer Photos to Samsung Galaxy Note 20/20 Ultra
>5 Ways to Transfer Photos to Samsung Galaxy Note 20/20 Ultra
![]() >5 Ways to Transfer Photos to Samsung Galaxy Note 20/20 Ultra
>5 Ways to Transfer Photos to Samsung Galaxy Note 20/20 Ultra
If consider Samsung Galaxy Note 20/20 Ultra as a great choice to replace your old phone, then how to move data to Samsung Galaxy Note 20 should be one of the concerns you need to consider. As we all know, moving data to a new device needs a good helper to avoid important data loss. This article will provide the best way to help you transfer photos to Samsung Galaxy Note 20/20 Ultra. Read 5 solutions we provide below, you will see it's a much simpler process to transfer photos to Samsung Galaxy Note 20/20 Ultra with the help of this article.

5 Solutions to Transfer Photos to Samsung Galaxy Note 20/20 Ultra:
 Solution 1. Import Photos/Photo Folders from Computer to Samsung Galaxy Note 20
For Android devices, you can plug your Samsung phone to computer then search photo folders. Copy all photo folders to computer. Or Copy photos from computer then paste photos to an opened photo folder. But there is a better way offered by Free Syncios Mobile Manager. It designed to manage, backup, restore, delete, edit data on iOS and Android phones and tablets. With its help, you can easily view all photo folders on computer and achieve a convenient transfer between Samsung Galaxy Note 20 and computer.
Step 1. Connect Samsung Galaxy Note 20 to Computer
To begin with, download and install this Free Syncios Mobile Manager to your windows PC or MacBook. Then connect Samsung Galaxy Note 20 to computer via USB cable. For android devices, you need to enable the USB debugging mode firstly. It enables the computer to get access to your phone data. Unlock your phone when connecting, and check all prompts timely to ensure a proper connection.
Download
Win Version
Download
Mac Version
Step 2: Import Photos to Samsung Galaxy Note 20
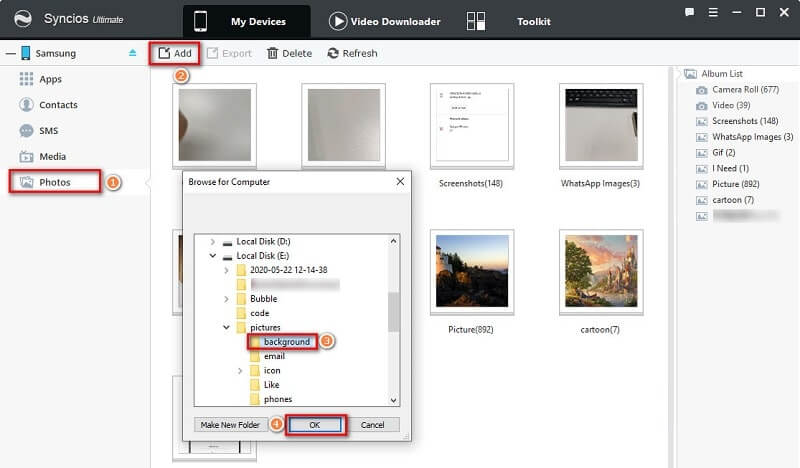
When the phone connected well, check the content sidebar on the left. Navigate to Photos tab. Click on it to load all photos and photo albums on your Samsung Galaxy Note 20.
From the album list interface, click on Add > Add Folder, then you can choose a photo folder from computer. Import it as a new photo album on your Samsung Galaxy Note 20.
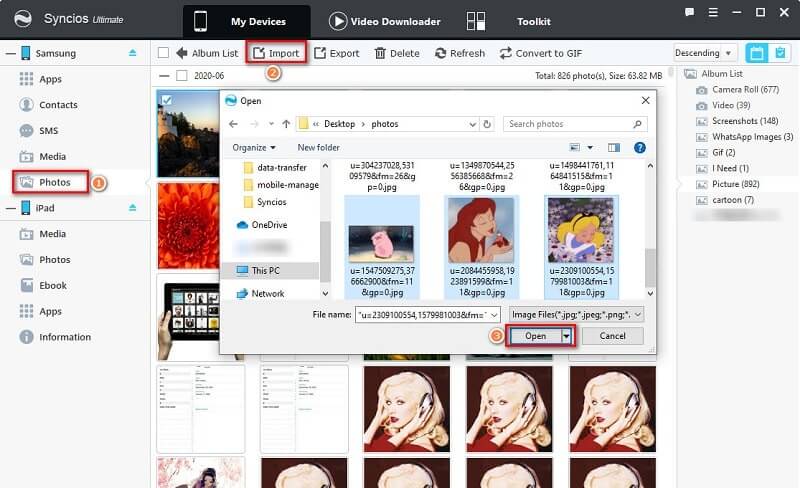
To import photos to an existed photo album, open the photo album, and click on Import to import photos to this photo album. You could not import photos to Camera Roll album, because photos taken by camera are saved under Camera Roll album. But you can transfer photos to other photo album.

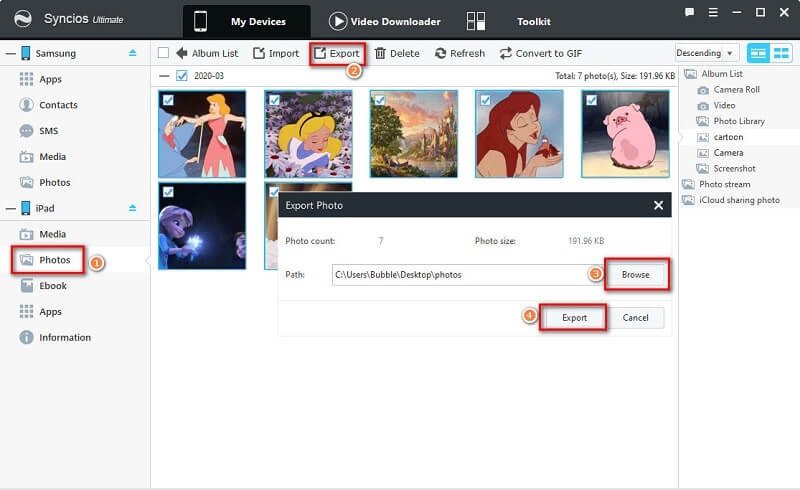
If you need to backup Samsung Galaxy Note 20 photos to computer or MacBook, just select photos and click on Export. Choose a proper saving path then save the selected photos or a photo folder to computer.
Solution 2. Copy Photos and Albums from Another iOS/Android Devices to Samsung Galaxy Note 20The Free Syncios Mobile Manager could support more than one device, so you can connect two devices to computer at the same time, backup one device, then restore the backup to another device. Through this method, you can preview and select photos you need to transfer.
Step 1. Connect Samsung Galaxy Note 20 to Computer
To begin with, start this Free Syncios Mobile Manager on your windows PC or MacBook. Then connect Samsung Galaxy Note 20 and a source device to computer via USB cable. Unlock your phone when connecting, and check all prompts timely to ensure a proper connection.
For android devices, you need to enable the USB debugging mode. But for iOS devices, you only need to choose "Trust" on the device when connecting. If you could not connect iOS device well, check this tutorial.
Download
Win Version
Download
Mac Version
Step 2: Export Photos from a Source Device
Navigate to Photos tab under the source device (iOS or Android) to load all photos from the source device. Then choose a photo album then click on Export. Or open a photo album and choose photos by date, then click on Export to save photos to computer.
Step 3: Import Photos to Samsung Galaxy Note 20
Navigate to Photos tab under Samsung Galaxy Note 20, then click on Add > Add Folder, then you can choose the photo folder you just exported from computer. Import it as a new photo album on your Samsung Galaxy Note 20.
To import photos to an existed photo album, open the photo album, and click on Import to import photos to this photo album.
Solution 3. One-click Sync All Photos from Another iOS/Android Devices to Samsung Galaxy Note 20Some users prefer a direct way to import all photos to Samsung Galaxy Note 20, also try Syncios Mobile Manager. It provides a data transfer tool. Check detailed steps below.
Step 1. Connect Samsung Galaxy Note 20 to Computer
Open Syncios Mobile Manager on your windows PC or MacBook. Then connect Samsung Galaxy Note 20 and a source device to computer via USB cable. For android devices, you need to enable the USB debugging mode firstly. For iOS devices, tap Trust when connecting. It enables the computer to get access to your phone data. Unlock your phones when connecting, and check all prompts timely to ensure a proper connection.
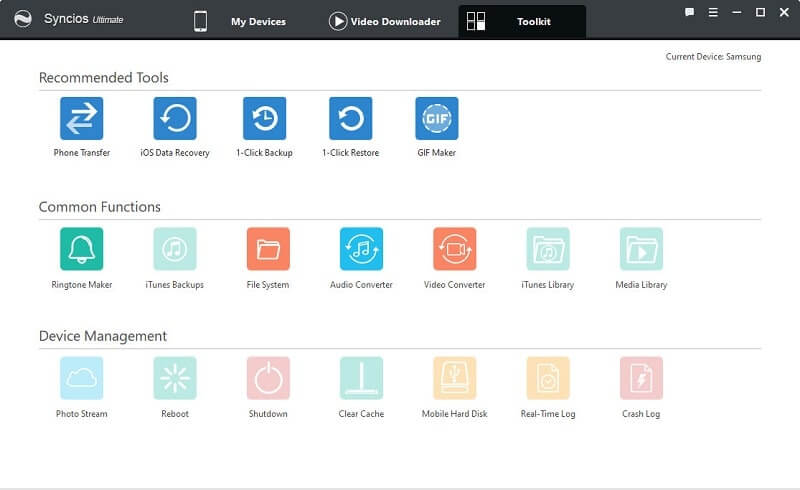
Go to Toolkit > Photo Transfer. Open this phone transfer tool under toolbox. Then you can see three modes: "Transfer, Restore, Backup". Now we are in "Transfer" mode.
Download
Win Version
Download
Mac Version
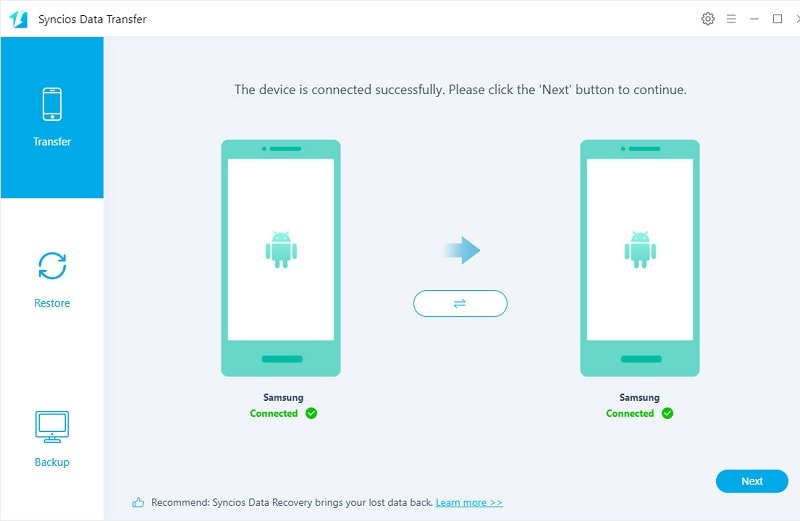
Step 2: Put Devices on the Right Places
Check positions of two connected devices. The source device should be at the left panel and the target Samsung Galaxy Note 20 should be at the right panel. A flip icon on the middle allows you to switch their positions easily. Then tap Next button.
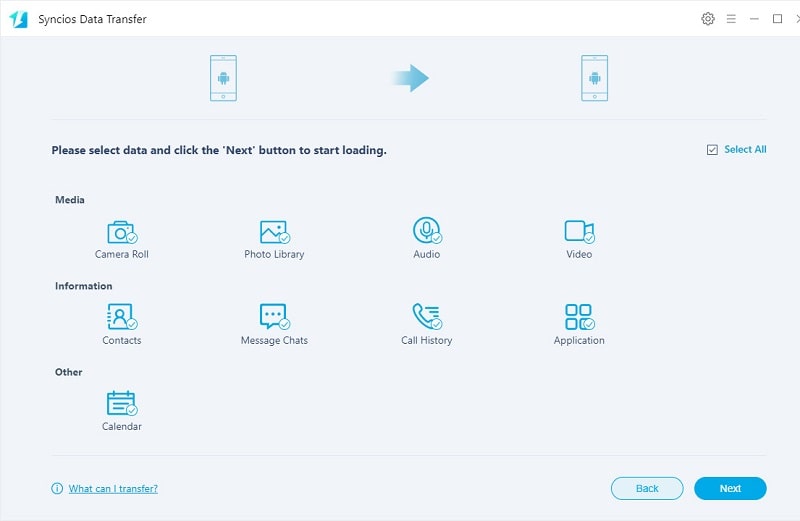
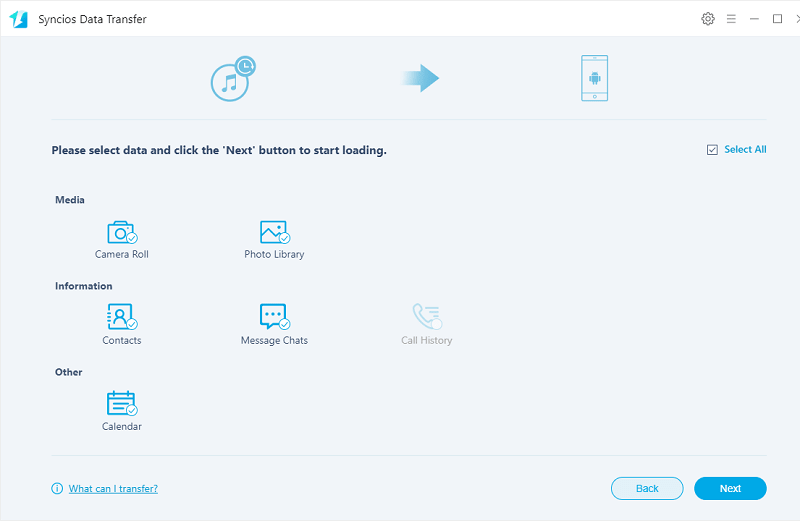
Step 3: Transfer Photos to Samsung Galaxy Note 20
Contacts, audios, photos, videos, messages, calendars, call logs, apps are available to transfer. Select Camera Roll and Photo Library if you only need to transfer photos. Tap Next button can start loading the photos from the connected source device. And click that button again will start the transfer.
Solution 4. Restore Photos from iTunes/iCloud backups to Samsung Galaxy Note 20If you think that's all Syncios Mobile Manager can achieve, you should check this method. The phone transfer tool it provides could also restore iTunes backup or iCloud backup to an iOS or Android device. Unlike restoring via iTunes, it will not overwrite the existing data on your phone. Instead, it merge data with the existing data on your phone. Check all steps below.
Step 1. Connect Samsung Galaxy Note 20 to Computer
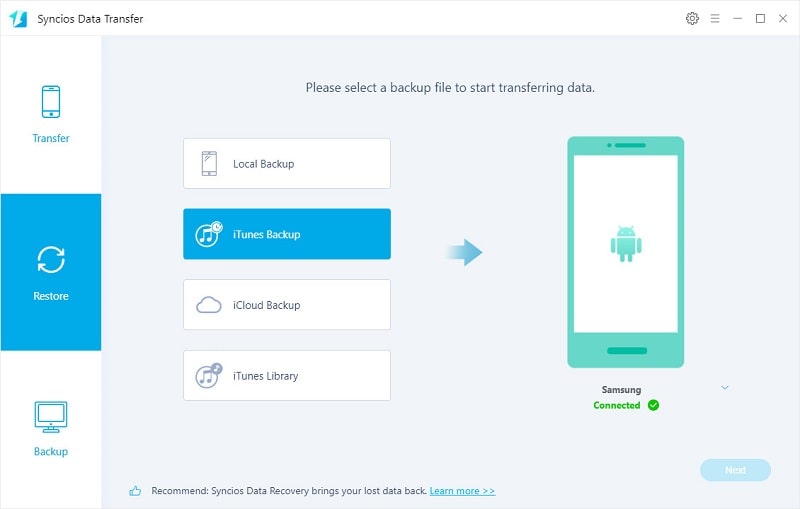
Start Syncios Mobile Manager and go to Toolkit > Phone Transfer. Connect Samsung Galaxy Note 20 to computer then choose Restore mode this time. Choose iTunes Backup option.
Download
Win Version
Download
Mac Version
Step 2: Restore Photos from iTunes Backup to Samsung Galaxy Note 20
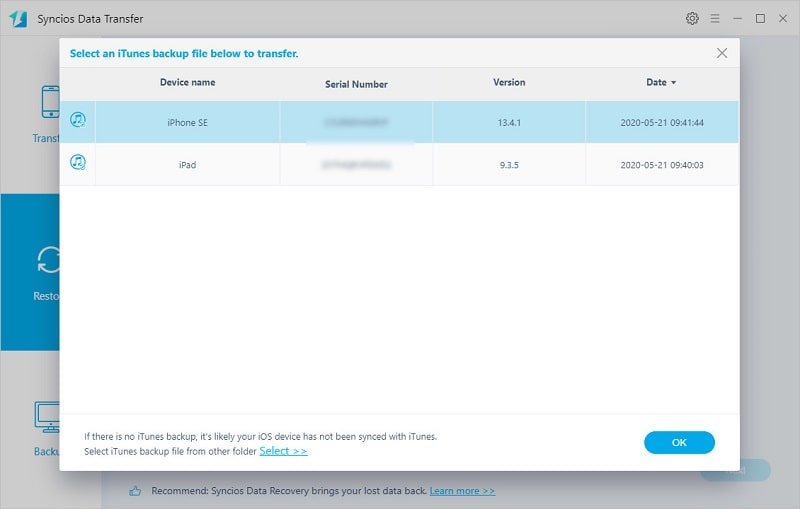
If you synced an iOS device with iTunes before, then Syncios will load all saved iTunes backup from computer. From the iTunes backup lost, choose a backup then click on Next.
Choose Camera Roll and Photo Library options. Tap Next button can start loading the photos from the iTunes backup. And click that button again will start the transfer.
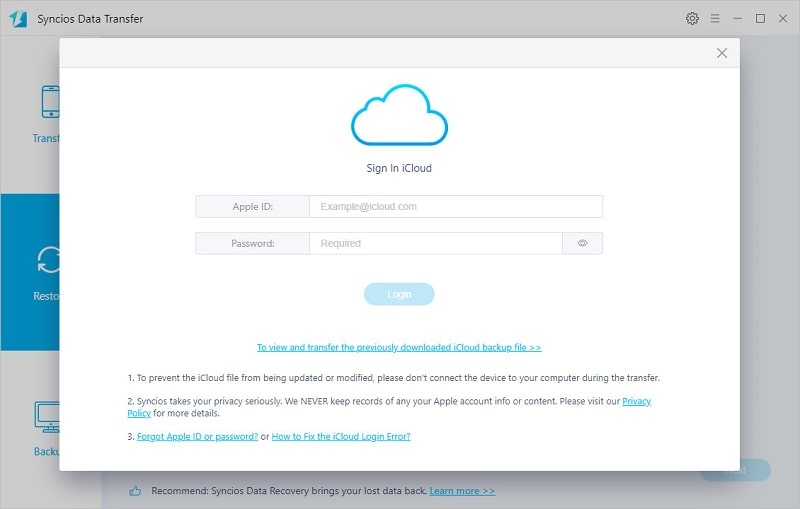
Step 3: Restore Photos from iCloud Backup to Samsung Galaxy Note 20
Click on iCloud Backup option will pop up a log-in window. Enter your iCloud account then load iCloud backups from this account. Syncios does not store any data, it just a transfer tool. So do not worry about your privacy information which is 100% secured by our privacy policy.
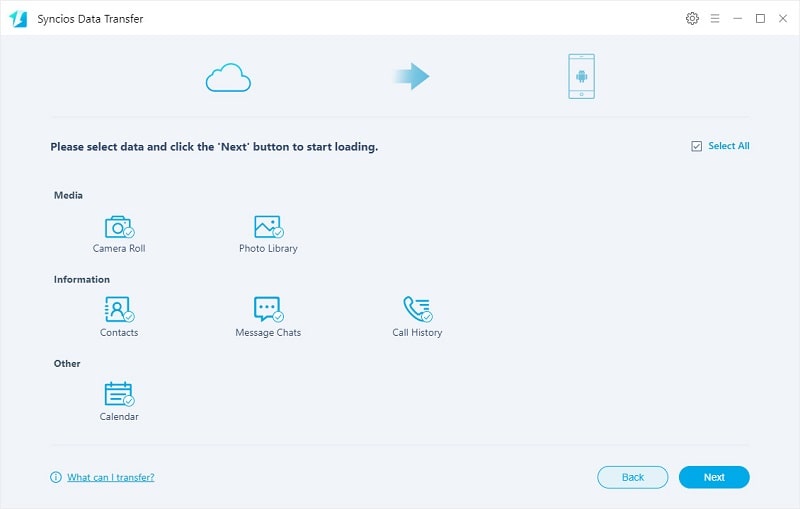
After that, download contents from an iCloud backup then close this window and click on Next.
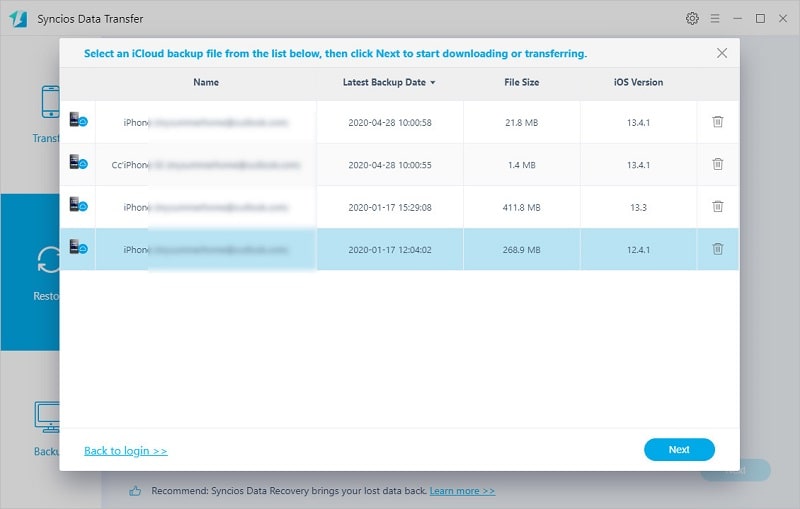
Choose Camera Roll and Photo Library options. Tap Next button can start loading the photos from the iCloud backup. And click that button again will start the transfer.
Solution 5. Transfer Photos to Samsung Galaxy Note 20 via Samsung Smart SwitchFor Samsung Galaxy users, there's an easy way to get those files over to your new Galaxy device. Samsung's Smart Switch Mobile app lets you wirelessly transfer data from your old Android or iOS device to your new Galaxy device. Here's how.
Step 1: Check both phones and ensure that they are fully charged as the data transfer might be a long process. Get an iOS lightning cable and an OTG cable which you will have to use later.
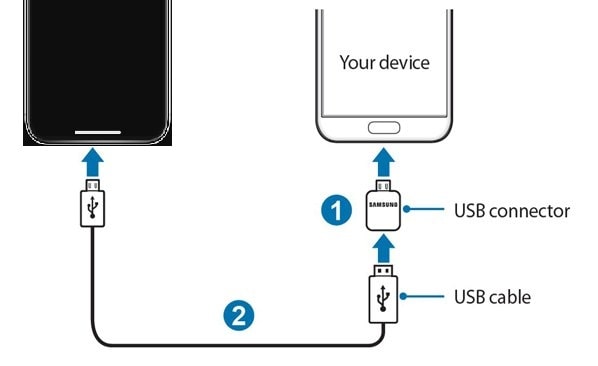
Step 2: Open the Smart Switch app on the Samsung device. Choose the USB cable transfer mode. Using iPhone's lightning cable and the OTG cable of Samsung phone to connect iPhone and Samsung.
Step 3: On iPhone, choose the "Trust This Computer" option when asked and then click on the Next button. Follow its instructions, then you can select contents you need. And click on the Transfer to transfer the selected contents to the Samsung device. The process will start and you will have to wait patiently until the entire data is copied.
Step 4: Once you are notified that the transfer is complete, disconnect the devices and then you have copied all your data on the Samsung phone.
Step 1: Get Smart Switch from Play Store on both devices. You can choose to transfer data via a USB connector or transfer data wirelessly. Start the app on the old Samsung phone and select the mode of transfer. If you choose to transfer without the USB connector, place the phones within 4 inches of each other.
Step 2: Start Smart Switch on both phones. Unlock both device, and choose Send Data on the old Android phone. Choose Receive Data on the new Samsung Galaxy Note 20. Now, you need to device to transfer via Cable or Wireless. After that, Smart Switch will scan the old phone for transferrable content.
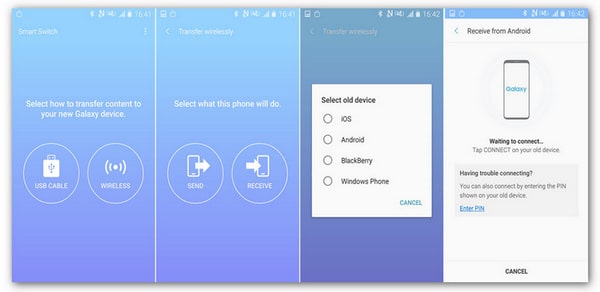
Step 3: On the Samsung Galaxy Note 20, you'll see a PIN code. Match the PIN on both the devices in order to establish a secure connection before commencing the transfer process.
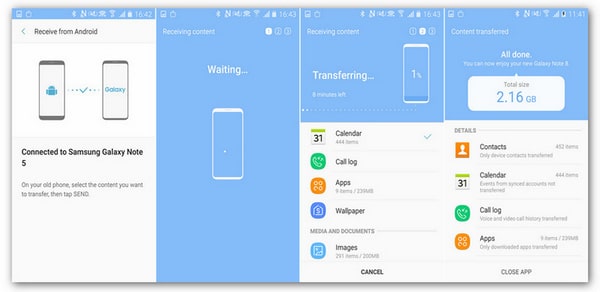
Step 4: Follow its instructions, select contents you need for transferring, such as photos. The just tap Transfer. It takes a while, when it finishes, tap Done on the new phone, and tap Close on the old phone. But you could not preview all details and some contents are not able to transfer.
Conclusion:
With all solutions shared above, you should know how to transfer photos to a phone, including Samsung Galaxy Note 20/20 Ultra. When you get a powerful tool, do not be hesitating, just have a free try now! If you like our ideas, please share it with people around you.
Download
Win Version
Download
Mac Version