![]() > Transfer Data from Xiaomi/Redmi/Poco/Mi to Redmi Note 9 (Pro)
> Transfer Data from Xiaomi/Redmi/Poco/Mi to Redmi Note 9 (Pro)
![]() > Transfer Data from Xiaomi/Redmi/Poco/Mi to Redmi Note 9 (Pro)
> Transfer Data from Xiaomi/Redmi/Poco/Mi to Redmi Note 9 (Pro)
In recent years, Chinese mobile phone manufacturer Xiaomi has gone from being a marginal player in the Asian market to becoming a global reference in the mid-market mobile phone sector. For Xiaomi clients, Xiaomi Redmi Note 9 act as a model experience at the end of 2020. So if you just updated our old Xiaomi to now a Xiaomi Redmi Note 9, you may need do some specific data migrations like WhatsApp, photos, videos or more. This article has cleared out some methods to fully complete a data transfer from Xiaomi/Redmi/Poco/Mi to Redmi Note 9/ Redmi Note 9 Pro, go and learn it now!
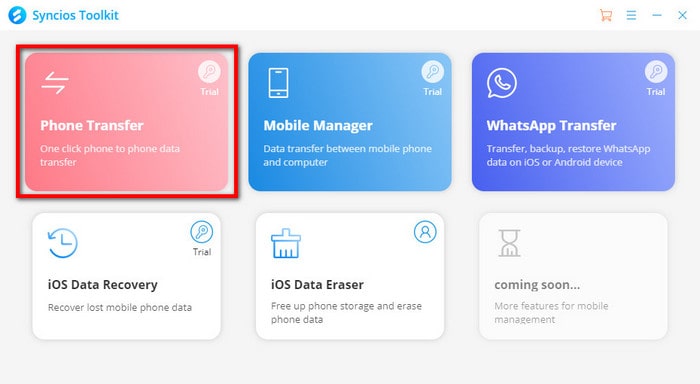
Sometimes, you are left wondering if there is a more straightforward way to achieve a phone to phone transfer? Of course! Check our guide in this terrific way. In this way, we will a Syncios Data Transfer, which is a brilliant helper to transfer contacts, message, call log, music, photo, video, apps and more from one phone to another, as long as it is iOS or Android system. And this guy is wonderfully combined Backup, Restore and Transfer functions to make a phone data safely migrate.
![]()
Preparation: If you are on the first try to use Syncios Data Transfer, you will download Syncios Toolkit on your computer when asking for your wanted program. After that, jut tap "Data Transfer" on Syncios Toolkit interface to run the program.
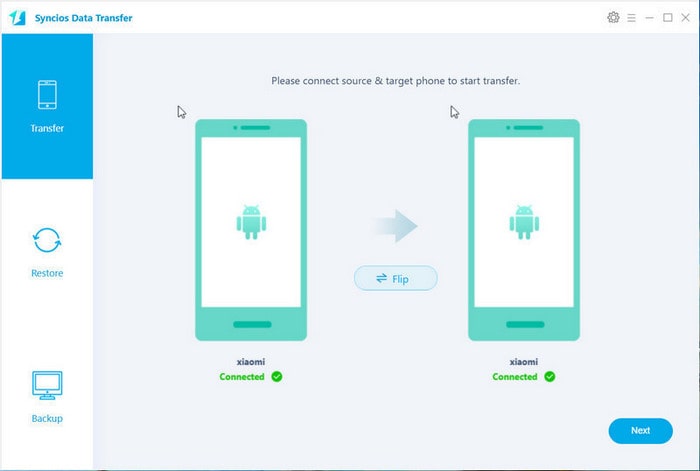
Step 1 As long as you run into Syncios Data Transfer, Transfer feature is turned on by default. So respectively connect the old phone and your Xiaomi Redmi Note 9 to program.
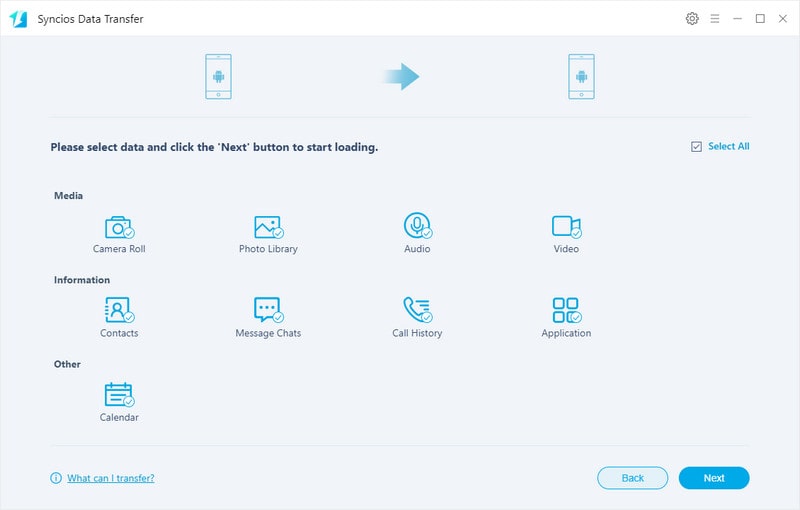
Step 3 Next, select the file types you want to transfer by ticking off the box in front of the item.
Step 4 Click "Next" button twice and complete the transfer easily.
As Smart Switch to Samsung, so Mi Mover is to Xiaomi. To transfer data from one to Xiaomi Redmi Note 9, Mi Mover may be the most official option. There are several steps to complete a wireless transfer to Xiaomi Redmi Note 9 with Mi Mover.
It is worth pointing out that despite its good recognition, wireless transfer is potentially data overwritten. If you want to play solidly during the transfer process, Syncios Data Transfer perfectly avoids data overwriting and loss.
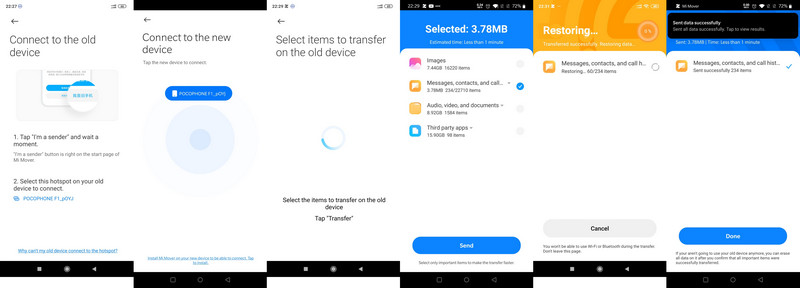
Step 1 In most cases, Mi Mover is pre-installed in Xiaomi phones. If not, manually install Mi Mover on the old Xiaomi phone and your Redmi Note 9.
Step 2 Upon installation done, run the app on your Redmi Note 9 and choose "I’m a recipient". Instead on your old phone, when the app is loaded, choose "I’m a sender" on the old phone. If necessary, grant permissions on both phones where required.
Step 3 Put both phones closer enough to detect until Note 9 show up on the old phone. Or you can actually build up a connection by a personal hotspot on one of the phone. In most of cases, a sharing Wi-Fi internet will be better to establish a wireless connection.
Step 4 Now on the old phone, choose what you wish to send over. Once you have selected the necessary items to send, simply press Send from your old phone. You’ll get a popup informing you to not turn on Wi-Fi or switch networks during operation.
Note: Just like we do for Syncios Phone to Phone Transfer in part 1, it is suggested you leave both phones alone until the transfer completes to ensure all your data carries over without incident.
In tradition when one switch to a new phone, he is likely to backup the data on his old phone. And PC is always the priority to save the backup file. However, there are couple ways to backup the phone data, either backing up by file types or backup all in one time. Among the ways to backup and restore, we find that Syncios Mobile Manager has a well combination of selective backup and one-click backup all at once feature. So let's go in details with these 2 results-oriented ways.
Step 1 Run Syncios Mobile Manager and connect to your old phone by using a USB cable. For Androids, you need to enable USB debugging mode on phone, thus Syncios will be able to read and access to phone data.
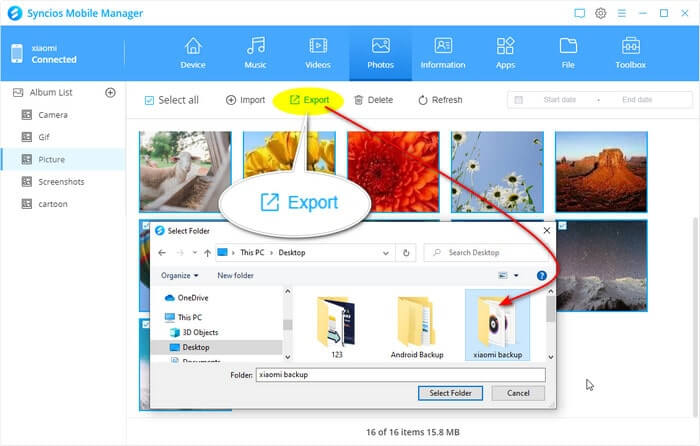
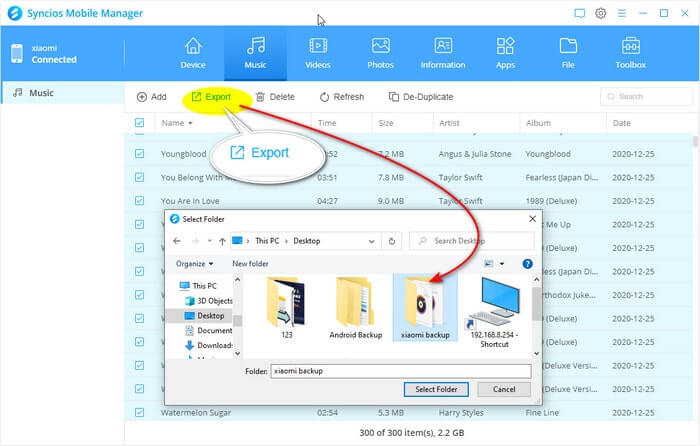
Step 2 Here we take the Photos and Music for example for example. Click Photos/Music from the menu bar at the top, photos/songs from the connected phone will present on the windows. At this point, you've got a smaller menu bar of instructional function including "Select All", "Import"/ "Add", "Export", "Delete" and "Refresh".
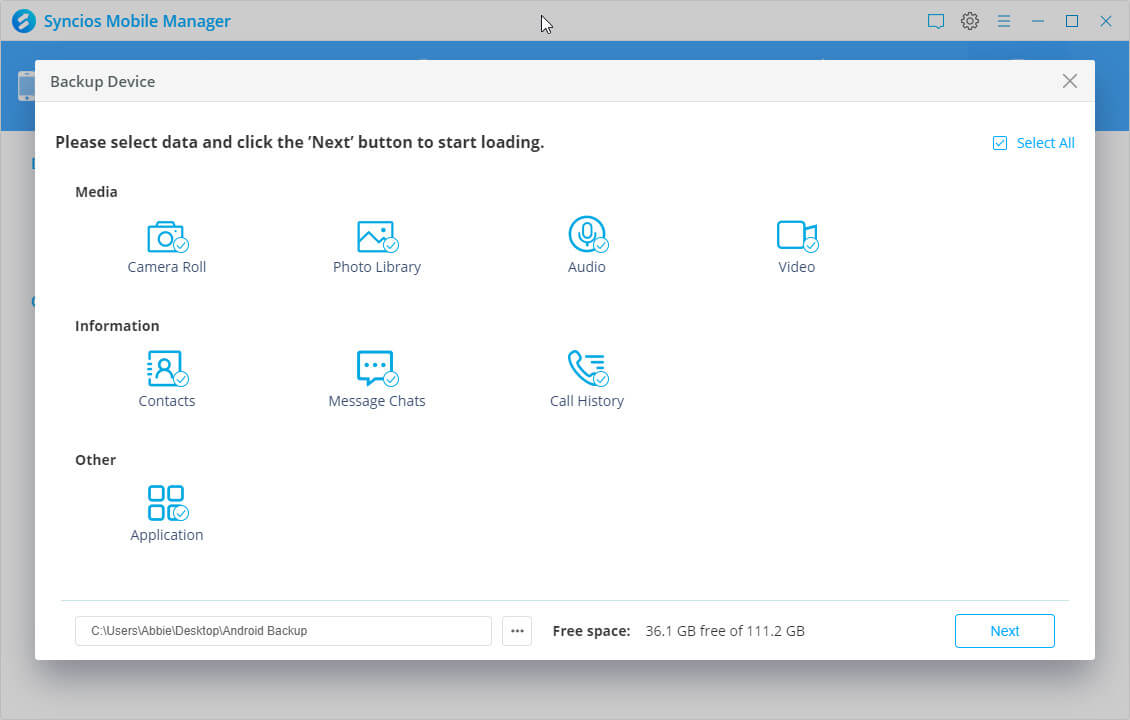
Step 3 Choose the photos/songs by albums or one by one select photos, tap the "Export" button and enter export path in this computer as shown in figure below.
After you got backup done, you can disconnect the old phone and connect Xiaomi Redmi Note 9 to Syncios Mobile Manager this time. Also, it depends on which file type you want to restore to Xiaomi Redmi Note 9 and go to the menu tab accordingly. Here we still make the example of photos/music.
Step 1 Connect Xiaomi Redmi Note 9 to Syncios Mobile Manager to Syncios Mobile Manager. ( USB debugging tutorial👉Fix the Android Device Detection Problem)
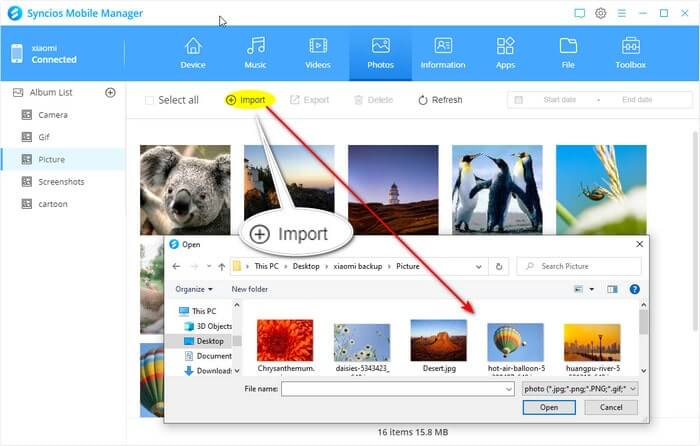
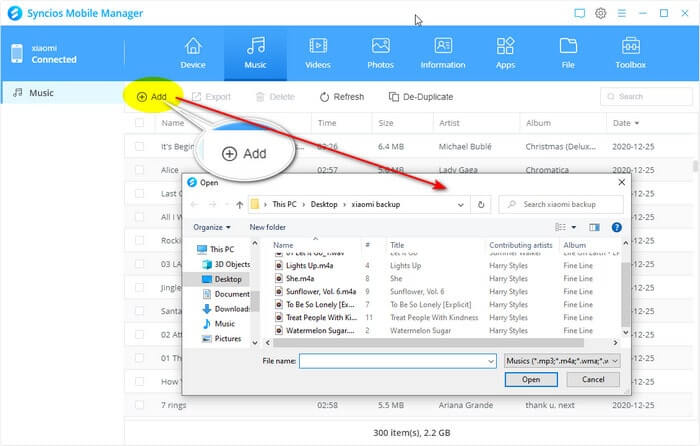
Step 2 Go to Photos/Music tab on the top menu and Syncios will display the photos existing on your Xiaomi Redmi Note 9.
Step 3 Click "Import/Add" button with a pulldown menu, tap"Add Files" or "Add Folder" and guide yourself to the previous export output location, choose the photos to transfer to Xiaomi Redmi Note 9 as expected.
For other files type like Videos, Information (Contacts, Messages, Call history), Apps and Files, you can work around with the steps above. To backup the old phone and restore to Xiaomi Redmi Note 9, you can absolutely choose on your own selection.
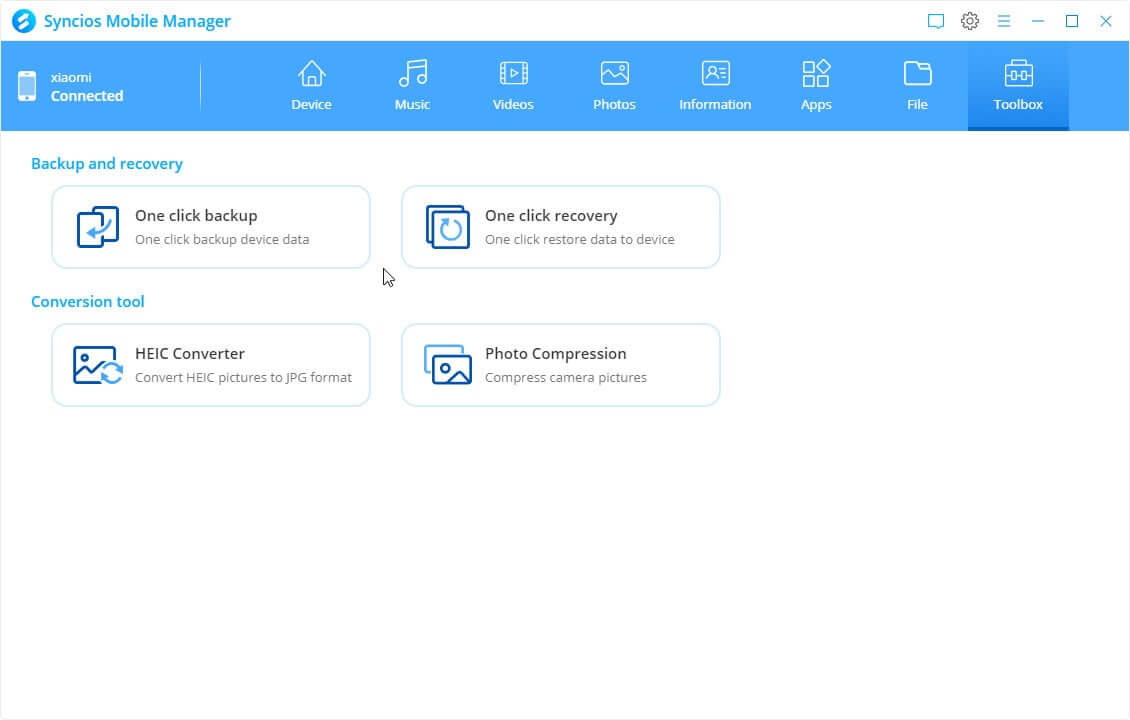
Still with Syncios Mobile Manager, you are able to take a full advantage of the One-Click Backup and Recovery feature to complete a safe data transfer to Xiaomi Redmi Note 9.
Step 1 Run Syncios Mobile Manager on your phone and connect the old phone to Syncios.
Step 2 Click on Toolbox option at the top of menu bar. Key functions One click backup allows phone easier to back up, tap into it.
Step 3 Select certain types or all of them. They can be "Camera Roll, Photo Library, Audio, Video, Contacts, Messages Chats and Call history".
Step 4 On the left corner of the window, choose a path where you want to store the files and finally click on "Backup" to back them up.
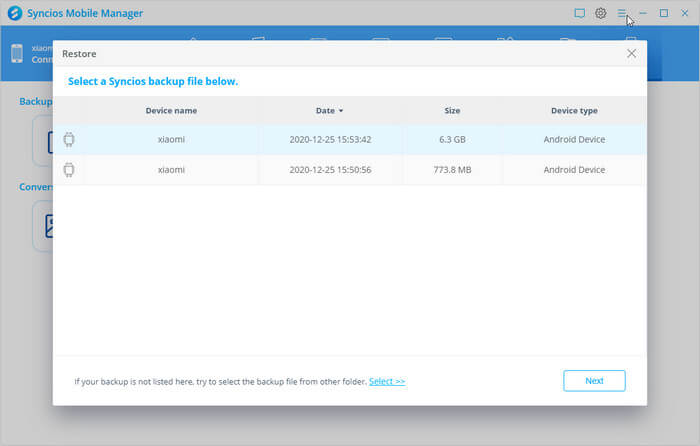
Step 1 Connect your Xiaomi Redmi Note 9 to Syncios and go to Toolbox, click into "One click Recovery".
Step 2 Choose the backup files that you did before and the file types you need.
Step 3 To avoid being repeatedly transferred, you can tick off the option "Clear Data before Copy" and then tap "Restore" to proceed. And the data will safely transfer from your previous phone to Xiaomi Redmi Note 9.

If you are confronted with computer problem, that is not to say there are ways to get around this annoyance. A Google account satisfies your transfer need when it comes to mobile files sharing. You can simply upload the data and file on your old Xiaomi phone to a Google account, whose backup contents will be accessible when you logged into your account on Xiaomi Remi Note 9. Since steps to backup mobile data to Google account vary depending on the types of files, so here we mainly introduce how to sync photos and videos from Xiao phones to your Xiaomi Remi Note 9 with Google Driver. Specific steps are here:
Step 1 On your old phone, run Google Photos app and logging into a Google account.
Step 2 Select Photos Settings > Back up & sync >>> Tap "Backup up & sync " on, and wait until the backup is completed.
Step 3 After you uploaded and synced the photos and videos to the google account, you can view the on any device where you logging the same account. So on your Redmi Note 9, open the Google Photos app and logging into the previous account as routine.
Step 4 Select a photo or video. Tap More > Download, the items to your phone.
Note: If you back up in original quality and you run out of storage, your photos will stop backing up. You can make some changes on the upload size or buy a storage plan for your backup demand.
Summary: Is there a tool prefer to others in this article? We choose Syncios Data Transfer is the number on for all kinds of data transfer, including phone to phone, iTunes to phone and backup phone to PC. So if you agree to us, get the trial version and prove it!