Built-in Voice Memos on iPhone 12 lets people record any audio the want and instantly save for re-use. Especially when we need to record some important conversations, voice messages helps to record effectively. What's more,make a safe backup plays vital important role in the job. So in this article, we are devoted to sharing you with some good tips to backup, restore and transfer voice memos on iPhone 12.

Voice memos saved on iPhone is hard to manage at a time. Instead, backup them to a PC to make an overall organization is not a bad choice. And we know that, you can eaisly transfer your iPhone photos to PC with a USB cable and vice versa. But for Voice Memos, a computer and a USB cable are not well prepared. You do need one more software to read and access voice files on iPhone 12 and helps to transfer to iPhone 12. To do that, we opt Syncios iPhone Manager, a free mobile software on PC, to access your iPhone 12 voice memos files, sorting them out on a bigger screen.
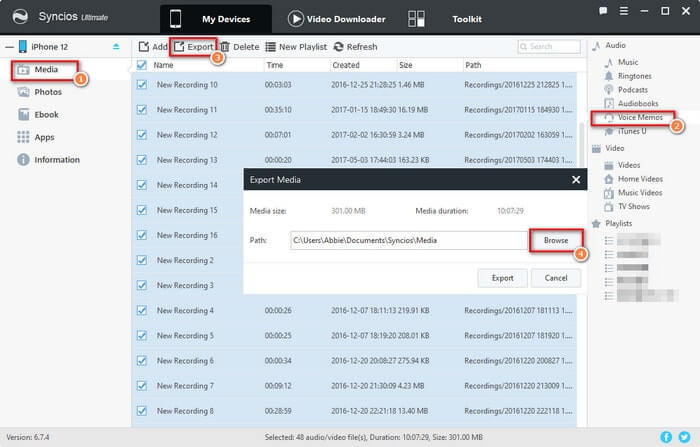
Step 1 Firstly, download and run Syncios Manager on your Windows computer. And then connect your iPhone 12 to Syncios with a USB cable. It is better to use with the original one. Plus, update your iTunes to the latest version but you don't need to runt iTunes when working on Syncios side.
Step 2 Go to 'Media' tab on the left, take a while letting Syncios extract your iPhone 12 data and present file types clearly on program.
Step 3 At this point, you've got a 'Voice Memos' option on the right memu bar. Tap it to preview them. The result of file order can be arranged by Name, (Duration)Time, Created (Time), Size and Path.
Step 4 Tick off the box in front of the file name and tap 'Export' to make a copy to PC. You are supposed to tap 'Browse' button to create a computer folder in local to store these voice files.
Step 5 If you backed up voice memos to PC via Syncios Manager, you can restore them to your iPhone 12 at any time. Tap 'Add' and guide to the path you put the backup, follow the instruction to complete a transfer.
If you want to singly transfer a voice recording to another person. And the targeted phone happens to be an iPhone or iOS device, then Air Drop is what a good helper for all Apple fans. To transfer part of the voice memos, you can get your job well done with Airdrop:
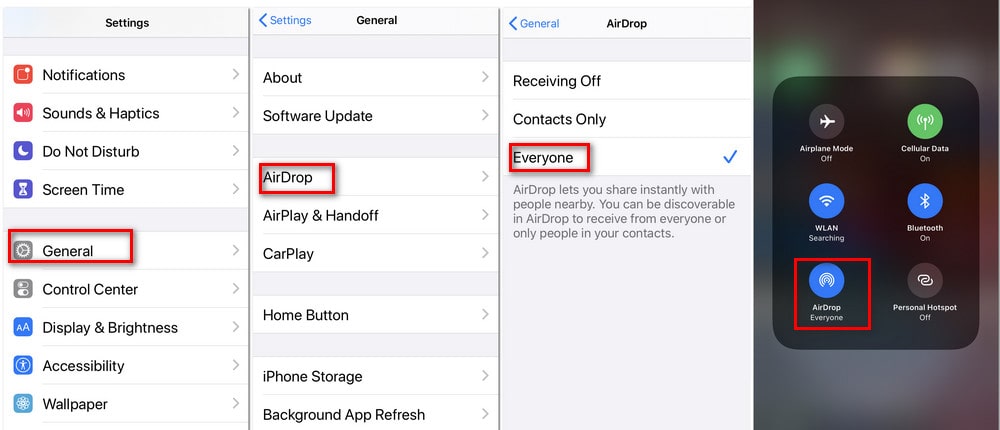
Step 1 Enable Air Drop on both iPhone 12 and another iPhone or iPad. Traditional way is to go Settings >>> General >>> AirDrop >>Everyone/Contacts Only. Faster way to open Air Drop on iPhone 12, just swipe download from the upper right corner of the screen and get into Control Center. When AirDrop turns on, both Wifi and Blue are intiated as well.
Step 2 Open the Voice Memo App on iPhone, choose of voice file and tap the 3 dots, and tap Share button, you will be provided an Air Drop option and hit on it. If you are to transfer voice memos from an iPhone to iPhone 12 (in this case), then do Voice Memos share with Airdrop on the source iPhone and target iPhone 12 to send the file.
Step 3 As for receiving device (iPhone 12), keep it as closer as it can be to source phone. It will pop up a prompts to accept the files or not. Tap 'Accept' and wait a few moment to complete it.
If you are used to backup files to iTunes backup, you can go with this way to restore your voice memos in iTunes backup to iPhone 12. Rather than using iTunes to restore Voice Memos to PC and transfer the files to iPhone 12, we give you a straightforward way to restore iTunes backup to iPhone 12. We will work with Syncios iOS Data Recovery, which provides entrance to iTunes backup and functions to restore Voice Memos to iPhone 12 directly. Let's go to see in details:
Step 1 Download and run Syncios iOS Recovery on your computer. And then connect your iPhone 12 to Syncios with a USB cable. Check your network environment to make it work smoothly.
Download
Win Version
Download
Mac Version
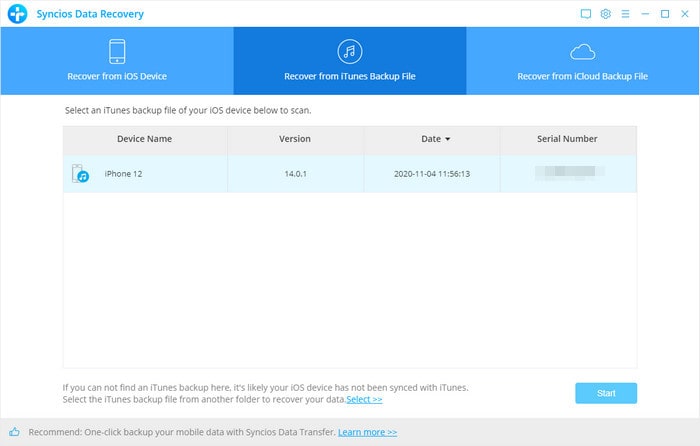
Step 2 On the front page, head to 'Recover from iTunes Backup File' mode. Syncios will detect your backup files that you used to do backup with iTunes. Pick the one you need and tap 'Start' button.
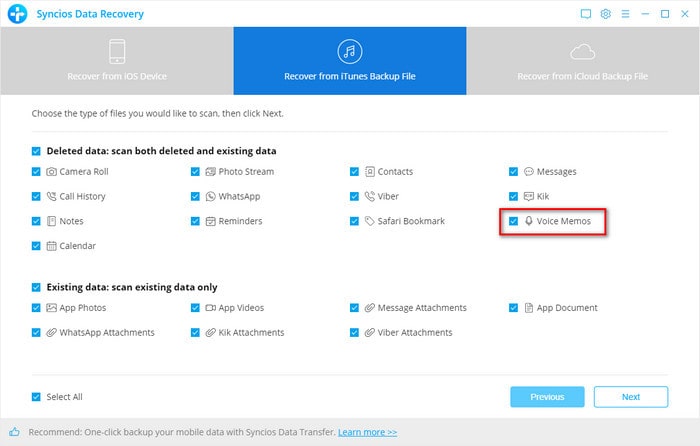
Step 3 Before a real scan, you can choose to only scan out your wanted file type, like Voice memos. You can also choose other files you need to scan together. Here, do tick off in front of the Voice memo option.
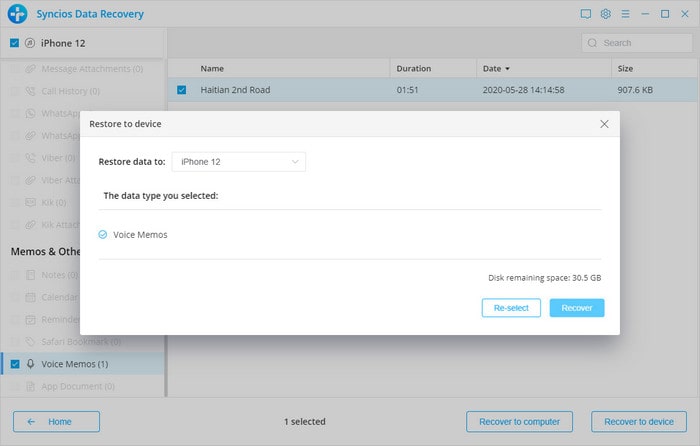
Step 4 Wait for a while until scanning finished and show you the result. Now you are presented with the Voice Memos contents after the process. To go on, choose the Voice Memos and tap 'Recover to device' . Do keep your iPhone 12 is well connected at this moment. And finally just wait until the whole process completed.
Summary: Yep, these are all we share with you to better organize the voice memos on your iPhone 12. Three ways are given to different needs covering to backup, restore and transfer. And tools introduced are very helpful in your daily use. If you want more tips on iPhone file types, let us know by leaving us message on the comment section.