![]() > Sync and Backup iPhone 12 Photos to Windows/Mac Computer
> Sync and Backup iPhone 12 Photos to Windows/Mac Computer
![]() > Sync and Backup iPhone 12 Photos to Windows/Mac Computer
> Sync and Backup iPhone 12 Photos to Windows/Mac Computer
This article is main to share some useful ways on syncing and transferring iPhone 12 photos to a Windows or Mac computer. Various ways and tools are introduced including Window's built-in Photos apps, iCloud Photos, AirDrop, Syncios programs. They all are simple ways to sync and backup a copy of iPhone 12 photos to computer. Thus you can remove some of photos on iPhone 12 and gain more available internal storage on iPhone 12.
This way is only available for whom having enabled photos to back up to iCloud. If you have no idea how to set up, go for a check on your iPhone: Settings > [your name] > iCloud > Photos, then turn on iCloud Photos. After that, your photos and videos will produce a copy in iCloud exactly as you took them. Still, sufficient storage is required if you own too many media files to backup to iCloud. There is 5G free storage for user. If you want more, Apple offers iCloud storage plans for those in need. In this way, you can directly by logging your iCloud on PC and download your iPhone 12 photos to PC easily.
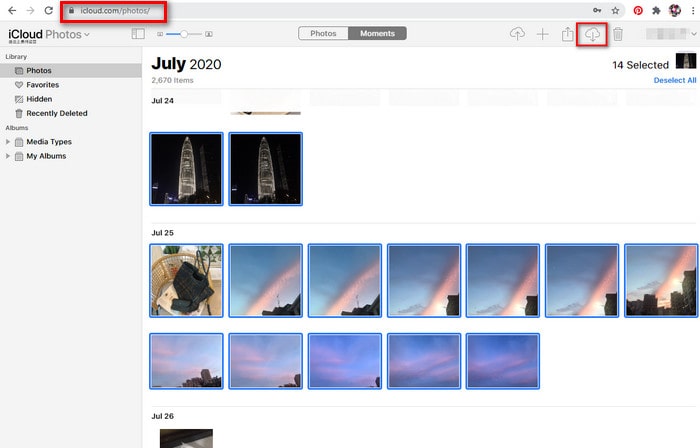
Step 1 Go to iCloud.com on a browser and log into your iCloud account. If on a Mac, go to System Preferences > Apple ID. Click iCloud in the sidebar, then select Photos.
Step 2 After you signed in, tap the Photos icon to view your iCloud photos in details. You can view them by the date you shot them.
Step 3 Select your wanted photos and tap the download icon on the upper right corner. And the photos will be save to your PC.
What if your photos files are larger than 5 GB, which is far more than iCloud can freely offers to you? How will you make a transfer of your iPhone 12 photos to PC? If you are fed up with iCloud’s 5G only free storage, we give you an excellent alternative that will absolutely alleviate the problem. We use a free tool named Syncios Manager Free, which allows to read and access all the photos and videos saved on iPhone 12. Users are freely to export the photos to PC simply.
Download
Win Version
Download
Mac Version
Step 1 Free download Syncios Manager to your computer. Figure here is showing your the Windows version. If you are Mac user, kindly go to Syncios Manager for Mac with user guide.
Step 2 Connect your iPhone 12 to Syncios Manager with the original USB cable. Do authorize Syncios to access to your iPhone data by tapping ‘Trust’ when you first time connect to it.
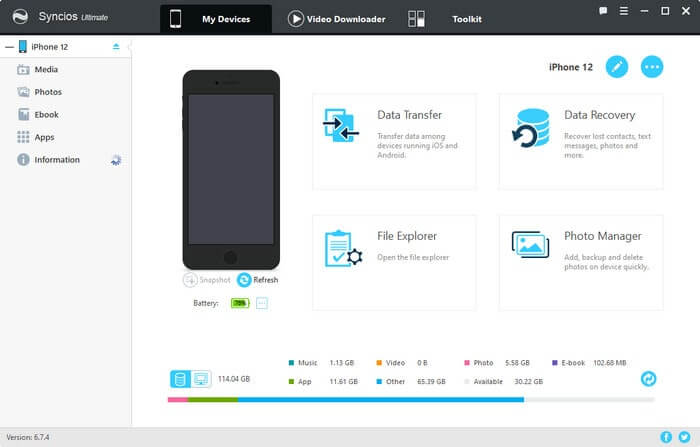
Step 3 Figure below shows you the application main page with a connected iPhone 12. Now move the mouse to the left sidebar and enter ‘Photo’ management. All the photos by album and dates are presented as the original as on your iPhone 12 right now.
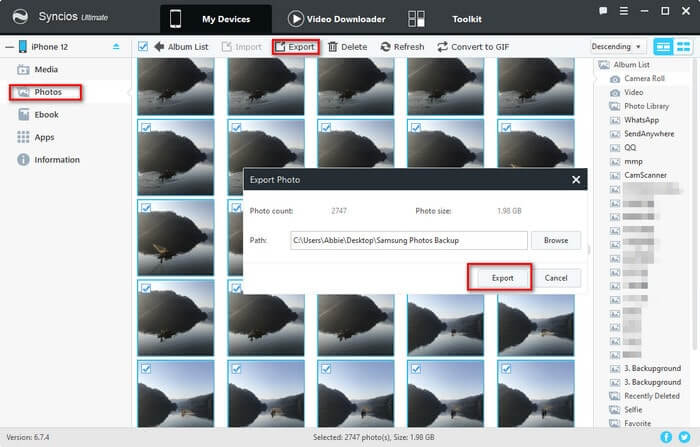
Step 4 Selectively choose the photos or press 'Ctrl+A' to choose all of them and then tap 'Export' button to make a copy of these photos to your PC. Default storage path will be Driver C. If you want to change it, tap 'Browse' and follow the instruction to reset a new path. Finally tap 'Export' to move on everything.
Instead of taking time to preview, some are searching for a straightforward way to migrate photos to PC. This way is exactly to get a fast and simple way to sync all iPhone 12 photos to computer, including Camera Roll and Photos Stream. To go with this way, we choose Syncios Data Transfer, whose Backup feature is the most effective.
Step 1 Download and run into Syncios Data Transfer. 3 main features give you self-style to manage iPhone 12 file. Choose 'Backup' mode in according with our article topic.
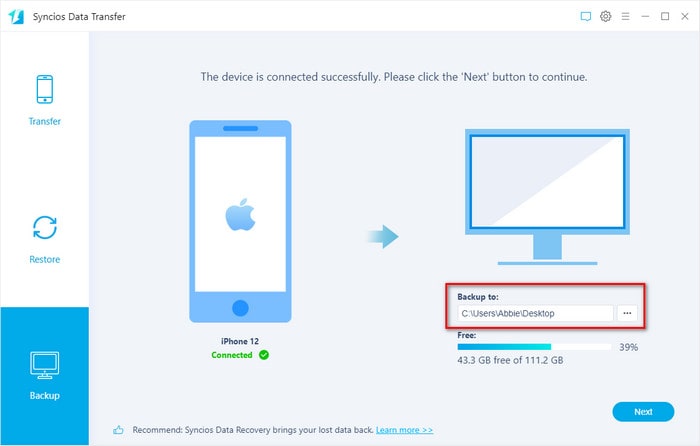
Step 2 Connect your iPhone 12 to Syncios via a USB cable. If Syncios fails to recognize at the first time, reasons could be these possible situations.
Step 3 You are supposed to create a local folder on computer to save the photos after backup. Tap the 3 dots under the computer icon. A window pops up to browse available place to store data on PC, just customize it based on your need.
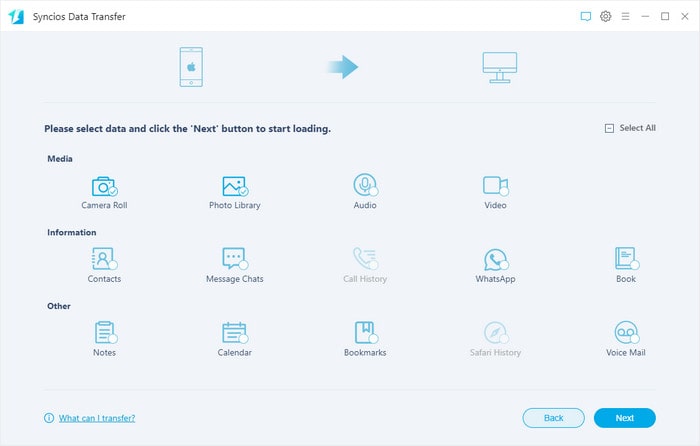
Step 4 The next is to select 'Camera Roll' and 'Photo Library' option when Syncios will access and read these photos files from your iPhone.
Step 5 Following, click the instructional 'Next' key to proceed the backup process.
What’s more, you can also directly restore your iPhone 12 photos from iTunes backup. Why choose Syncios iOS Recovery instead of conventional way? Owing to its technical recovery performance, you can also find out your lost or deleted photos from iPhone 12 and restore them to PC. By this way, you are able to transfer your photos to PC without using iPhone 12.
We are going to use with Syncios iOS Recovery that owns powerful functions to retrieve lost or deleted iPhone 12 data to PC, whatever it be photos, videos, contacts, messages, notes, call logs, safari history, calendar. And app data like WhatsApp, Kik, Viber, iPhoto, etc are supported as well.
Step 1 Download and run Syncios iOS Recovery on computer. To restore data from iTunes backup, you don't have to connect to iPhone.
Download
Win Version
Download
Mac Version
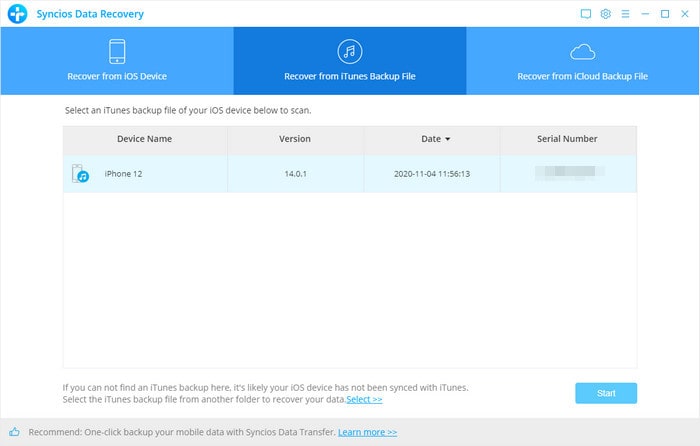
Step 2 Tap into 'Recover from iTunes Backup File' mode above the menu. If you have ever logged into iTunes on your computer, there will be some iTunes backup folders ready to restore from. Tap into the one you want to restore from according to the device version and the backup date.
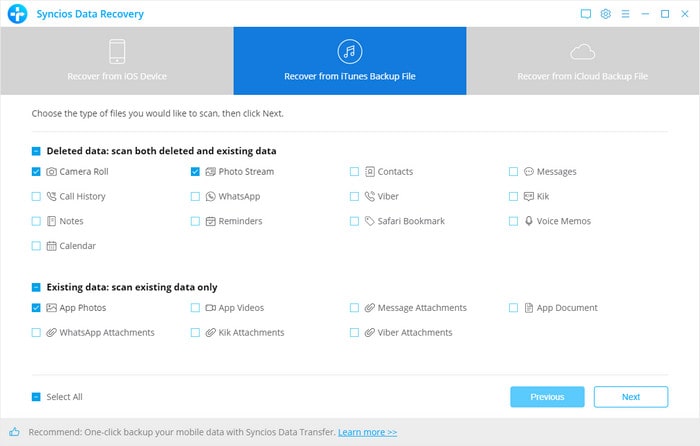
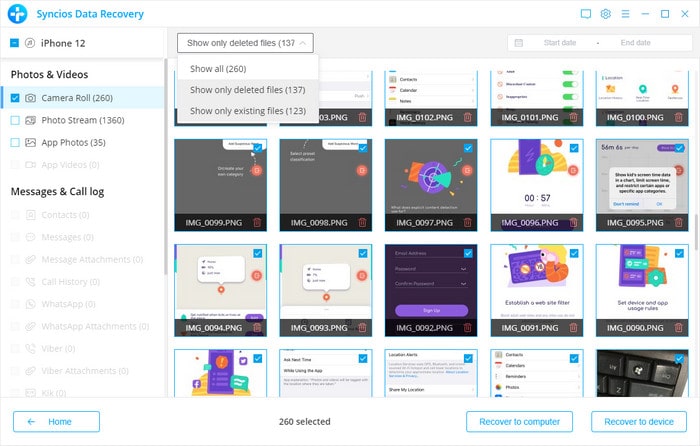
Step 3 Then next is to choose the type of files you want to scan from iTunes backup. Files are divided into 2 categories, Deleted Data and Existing Data. You just tick off Camera Roll and Photo Streams and App Photos to scan. Then click Next to scan.
Step 4 Now you can preview the photos items within Syncios. To sort out those deleted, tap the box upper the interface, choose 'Show Only Deleted Files'. You can also choose to show all scanned photos.
Step 5 After an overall view of the photos, choose the items that you want to recover, and tap 'Recover to Computer'. Not a while, photos from iTunes backup will be copied to PC.
If you're running Windows 10, then built-in Windows Photos App does you a good job of handling photos and videos. But let me tell some truth. Sometimes the app runs into performance issues, doesn’t work smoothly or loads images that fast. However, if you are likely to try, you can also use this viewer to directly preview and import iPhone 12 photos to Windows computer.
Step 1 Use an iPhone USB cable to connect your iPhone 12 to Windows computer port. Authorize iPhone to trust the computer but not charge only.
Step 2 In the search box on the task bar, type photos and then select to open the Photos app from the results.
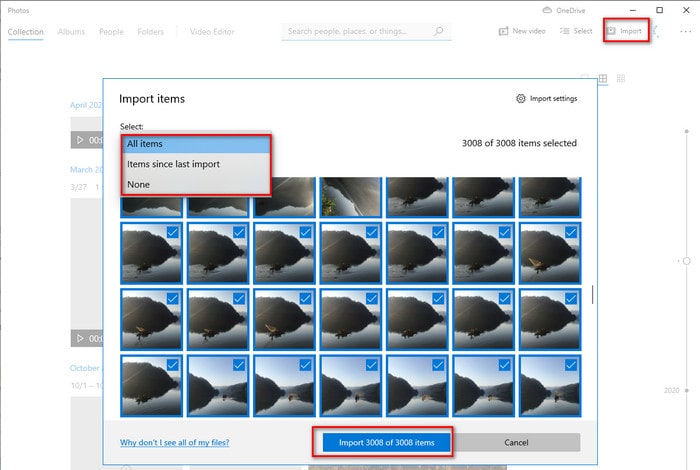
Step 3 On the upper right cornet, click 'Import' >>> 'From a USB Device'. And it will automatically load all the photos items from your connected iPhone 12.
Step 4 You can choose all by All items option, or selectively choose by ticking off the box. After that, tap Import [Number] of [All] items to proceed. If completed, a small window noting 'All Done' will pop up in the lower right corner.
Whereas, if you are on Mac side, Windows photos app is far from you. Don't forget, Syncios Manager or Syncios Data Transfer helps. At last, we find one more way for Mac users to transfer photos between iPhone and Mac computer, that is AirDrop. Yep, with Airdrop, you can wirelessly share photos and other files to a nearby iPhone 12 and Mac on the same Wifi. And Bluetooth and Wifi should be available on both sides.
Step 1 On your Macbook, click on Go on the Finder window. A drop-down window follows, choose AirDrop. If you have not turned on Bluetooth yet, click the Turn on Bluetooth on the how screen. If AirDrop is successfully enabled, AirDrop icon turns into blue color.
Step 2 On iPhone 12, swipe down from upper right to open Control Center. Tap AirDrop, then choose receive items from everyone.
Step 3 On iPhone 12, go to Photos gallery, select the photos you want to send. And tap Share icon, choose AirDrop, select your Mac as the recipient.
Step 4 On Mac, a pop-up prompts to receive the files, tap 'Accept' and completed very quickly.

Summary: We list 6 ways for you to sync, transfer and backup photos on iPhone 12 series to computer. Among them, Syncios Manager Free and Syncios Data Transfer are good choice. And for deleted photos, take a shot to Syncios iOS Recovery. Other ways with iCloud, Windows Photos app and AirDrop are your backup choice, too. If you have more ways to share on this topic, very welcome to your precious advice.